Microsoft AD
As an Admin with integrations permissions, you can sync your occupancy data or directory via Snowflake.
When using Microsoft AD for Directory this means your active directory can be seamlessly populated in gospace AI, so you can start to automate for all your users, and map them to teams without any manual inp
To begin, click on "Microsoft Active Directory - user management" for directory on the integrations page. You'll then see the below.

Client ID and secret
When it comes to getting your Client ID and Client Secret, you can find this within the Azure Portal under the App Registration's blade.
1) Login to the Azure Portal
2) Navigate to Azure Active Directory
3) Select App Registrations, locate the Azure AD App that you're trying to find the Client ID and Client Secret Key for
4) Within the Azure AD App, select Certificates & Secrets
Note: Once a Secret is created and you navigate away from the Certificates & Secrets page, the Secret value is no longer available to be seen or copied.

For more detailed steps on how to get these values you can reference - Get tenant and app ID values for signing in
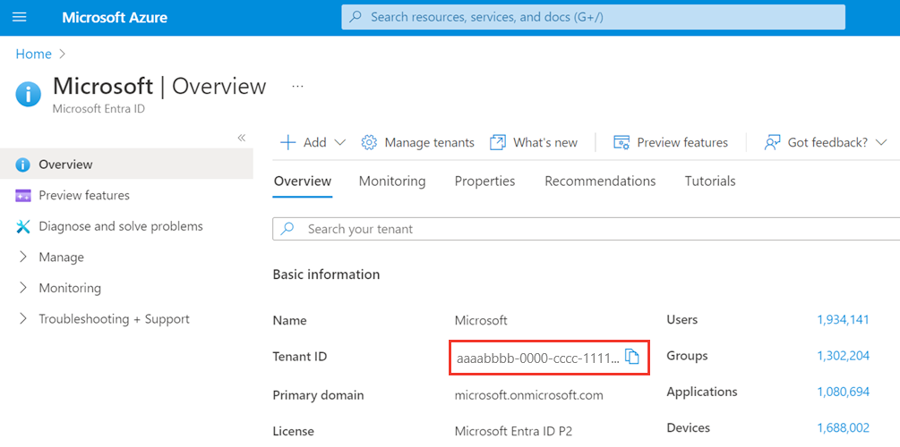
Tenant ID
To get your Azure AD B2C tenant ID, follow these steps:
Sign in to the Azure portal.
If you have access to multiple tenants, select the Settings icon in the top menu to switch to your Azure AD B2C tenant from the Directories + subscriptions menu.
In the Azure portal, search for and select Microsoft Entra ID.
In the Overview, copy the Tenant ID.

For more please see here.
If everything looks good, click "Continue" to create your SFTP integration. gospace AI will then test the connection to your SFTP server and verify that it can successfully authenticate and access the specified file path. If the connection test is successful, your SFTP integration is ready to start mapping to import your users, teams or both.
Permissions:
gospace AI needs permissions to all the below
Users
User.Read.All
User.Read.All
Groups
Group.Read.All
Group.Read.All
Group Members
GroupMember.Read.All
GroupMember.Read.All
Similarly, in Azure AD
Go to App registrations ▶ Your app ▶ API permissions.
Under Microsoft Graph, add Application or Delegated permission
Group.Read.All(or the broaderDirectory.Read.Allif you need it).Click Grant admin consent.
Next steps:
Map your directoryLast updated